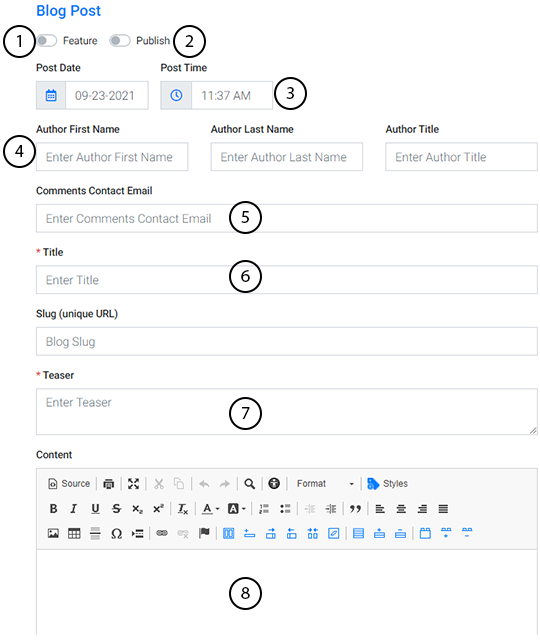
To add a new blog post, you’ll first need to navigate to the Blog tool in the Plug-Ins Manager. After selecting the Blog tool, you can add a new post from any tab. To do so:
Select the blue button labeled “Add New Blog Post”
After selecting the “Add New Blog Post” button, you’ll be able to set up the blog specifics.
- Assign the blog as a featured post (meaning it will display as a featured item on your blog).
- Assign the blog to publish immediately by selecting the publish button. It is set to leave the blog unpublished by default and respect the date and time selected in step 3.
- Assign the date and time you’d like your blog to post on
- Assign an author for the post by including the author’s first and last name and title.
- Include an email address where the recipient will be notified of any new comments on the blog post.
- Enter the title of the blog you are creating.
- Enter a teaser or a short sentence to highlight what the blog post is about.
- Next, enter your blog content in the content section. Here you can edit and format content just as you would on a normal content page.
Next,
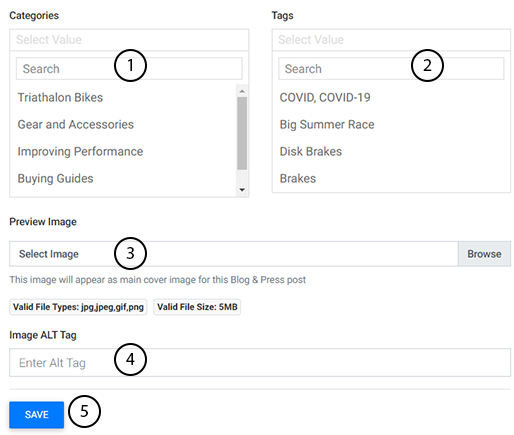
- Enter the category you’d like the blog to appear in, search or select existing categories from the list. Categories help you organize similar topics together (Ex: Academics)
- Enter the tags you’d like to associate with the post. You can also search or select existing tags from the list. Tags provide an additional level of organization. (Ex: New Students, Orientation Guides, Fall Semester)
- Select a featured image. Note: This image is the main image displayed on your website’s blog area for this post.
- Enter Image Alt Text for the featured image. This step is optional but is helpful for allowing users with screen readers to still understand what images are on your site.
- Save your new post. Note: if “Publish” was selected in Step 2, Saving the new post will also publish it live to your site. If it was not selected, the post would save in the “Unpublished” tab within the Blog Tool plug in.
Watch Related Video Tutorial: Blog Tool Page Setup


